Apple’s iOS 17 arrived in September 2023 and brought a number of new features to the iPhone, including improvements to FaceTime, an advanced AirDrop, and the nifty home hub screen of StandBy. One of the most popular additions in this update was Contact Posters, which allows iPhone users to customize the appearance of their contact card, allowing them to standardize what pops up when they call, text, or FaceTime friends and family.
Whether you’re just updating to iOS 17 or finally migrating from Android, creating a Contact Poster allows you to get creative, with the option to use a monogram, a photo, or a Memoji. You can also customize the color and hue of your card, leading to what feels like infinite possibilities. Below, we break down how to create Contact Posters in iOS 17, explaining everything you need to know.
How to create a Contact Poster in iOS 17
Creating your Contact Poster in iOS 17 takes just a few simple steps:
- Make sure you’re logged into your Apple ID. (You can check by tapping Settings. If you’re signed in, your account information will appear at the top of the screen.)
- Open your Phone app.
- Tap Contacts.
- Tap your name, which will be at the top of the screen, followed by My Card.
- Tap Contact Photo & Poster.
- You’ll then see your default Contact Poster. If you’d like to change it, tap Edit. (If you’d also like to change your display name, tap Name, which will allow you to change the first and last name that appear when you call or text someone.)
- Tap the + button to create a new Contact Poster.


From there, you’ll be able to customize your Contact Poster with a photo, a Memoji, or a monogram.
Customize your Contact Poster
There are four main options for customizing your Contact Poster: taking a new photo (with the Camera app), using an older photo (from your Photos), creating a Memoji, or using a monogram. But that’s just where the customization begins: from there, you can play with colors, filters, and other aesthetics.
Take a new photo
- Tap Camera. This will open your iPhone’s Camera app.
- Snap a photo you’d like to use for your Contact Poster.
- Tap Use Photo when you’ve found a good one. You can tap Retake until you get it just right.
- From there, you can customize the appearance of your photo in a few ways. You can alter the font, size, and color of your name by tapping on the text.
- You can also run your photo through numerous filters and aesthetic styles by swiping to the right.

You can run your photo through 10 filters before making a final decision.
You also manually crop the photo by pinching it–just like you’d do to zoom in on an image. You can also add Depth Effect by tapping on the ellipsis or “three dots” button in the bottom right hand corner of the screen. - When you’ve found a combination you like, press the blue Done button in the upper right hand corner.
- You’ll be presented with a preview of your Contact Poster. If you’re happy with how it looks, tap Continue.
- You’ll get one more preview of the circular photo that will appear in friends’ contact lists next to your name. If you want to fine-tune the appearance, you can crop or simply choose a different photo. But we’re guessing by this point you’ll be ready to finalize your Poster. If that’s the case, tap Continue one more time.
- Congrats! You’ve just set that photo as your Contact Poster.


Use a photo from your library
- Tap Photos.
- That will open your photo library, toggled to “Suggested” photos, which are portraits that Apple believes would be good fits for a Contact Poster. If you want to look through your entire library, tap All in the upper left hand corner and scroll through or search for a photo. When you’ve found the one you want, tap it.
- Follow the same steps you would for using a new photo to customize your picture.

Memoji
- Tap Memoji.
- Choose from pre-existing Memojis or create a new one by tapping the + icon.
- Once you’ve picked a Memoji, you can select an expression or tap the Camera icon to create one based on your actual face. (Capture it by tapping the blue circle to the right of the Memoji.)
- Tap Next.
- The Memoji will appear below your name. Tap your name to customize the appearance of the text. After you’ve made your customizations, tap Done in the upper right hand corner.
- You’ll see a preview of your Contact Poster. If it looks good, tap Continue. If it doesn’t, hit Back.
- You’ll see a preview of how your Contact Poster will look inside a circle, next to your name in your friends’ Contacts. You can adjust the image by tapping Crop. You can also tap Choose a Different Photo if you’ve had second thoughts about your Memoji. If it all looks good, tap Continue.
- You’ll see one final screen, showing your finished Contact Poster in its numerous forms. If you want to change something, tap Edit. Otherwise, you’re all set!


Monogram
- Tap Monogram.
- You can tap on the background to change the color. You can also tap on your name to alter its font and color. After you’ve customized to your liking, tap back on the Monogram, then tap Done in the upper right hand corner.
- You’ll see a Preview Poster of your Monogram Contact Poster, showing what will appear when you call friends. If you like the look, tap Continue. If you want to make a change, tap Back.
- You’ll see a preview of your Contact Photo, which will appear next to your name in your friends’ Contacts. If you like the look, tap Continue. If you want to do something different, tap Choose a Different Photo.
- Huzzah! You’ve now got a Monogram for your Contact Poster.


Contact Poster privacy settings
If you want to control who can see your contact name and Poster, you can adjust the default settings for your Contact Poster with just a few quick steps. Here’s how:
- Make sure you’re logged into your Apple ID. (You can check by tapping Settings. If you’re signed in, your account information will appear at the top of the screen.)
- Open your Phone app.
- Tap Contacts.
- Tap your name, which will be at the top of the screen, followed by My Card.
- Tap Contact Photo & Poster.
- Below the preview of your Contact Poster, you’ll see three different settings that can be adjusted.
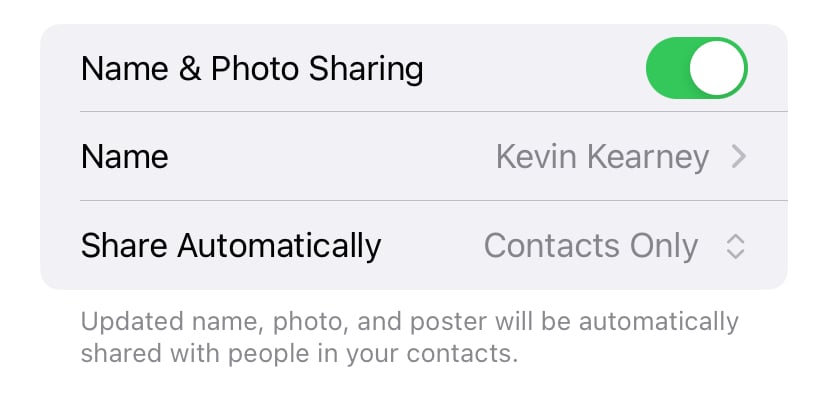
If you’re looking to change the default privacy settings for your Contact Poster, this is where you can turn off Name & Photo Sharing, amend your contact name, or adjust whom the Contact Card is automatically shared with.
Kevin Kearney
Deputy Editor

Find a better phone plan
Thousands of cell phone plans unpacked. All the facts. No surprises.
Related Articles


Find Better Phones and Plans
Hundreds of cell phone plans unpacked. All the facts. No surprises.


 for $0 and $26.20/mo for 24 moths from Bell")


